
The Eight Sleep Pod is a water cooled/heated mattress topper. It’s designed to regulate body temperature to maximize quality sleep. Overall, I have found that I get better sleep, more consistently using it. The materials used feel high quality and, at least in my experience, it’s quiet.
However, not only is it expensive, they force people into a subscription to use their cloud services. For many reasons, I don’t like that.
Cloud == Bad?
In 2024, “The Cloud” has been slowly creeping into many products. TVs, cars, toasters, and now our beds. Sometimes, it’s nice to offload heavy computation away from the local device, allowing a more fit machine to do the work. However, Cloud services are increasingly being used to justify questionable subscription services when the device is more than capable without it. The Cloud can also come with increased input lag, unreliability, and privacy concerns. In an ideal world, companies would only offload work when strictly needed. This, clearly, isn’t the ideal world.
Luckily, with a little prodding, we can fight back and take control of the hardware we own.
The Eight Sleep Cloud
The company Eight Sleep has been particularly aggressive with the “forced Cloud”. Their products could, in theory, operate completely local. Instead, the Eight Sleep app talks exclusively to their servers to send commands to their mattress topper. This means if your internet is down, you can’t sleep. Additionally, all your sleep data is continuously streaming to their servers. They know when you are sleeping, and not in the cute Santa Claus way.
This is all largely to justify a ~$200/yr subscription.
If your subscription runs out, they take away even the most basic functionality, like scheduling. It’s gotten so bad the (official?) subreddit, /r/eightsleep, has a pinned post warning people not to buy their products.
Let’s see if we can fix this.
Investigation
The first step in Cloud removal is to reverse engineer how everything works. This will allow us to find wedges in the system we can hook in to and seize back control. There has been a good amount of work done here by the community already, so we can stand on some solid shoulders here.
What we know already about the Pod 3:
- It runs on the Linux operating system
- It connects to a Cloud server, not taking incoming connections for commands itself
- It’s hard as hell to open the plastic case
To start, the only interesting point is that it runs Linux. Since we know that, we can focus on getting “root” access to the device. Root access (or admin) will allow us to get full control over the hardware to do whatever we want. At this stage, we only care about getting root, no matter how difficult it is. We just want to figure out how the Pod works. Later, we may find easier ways to get control in order to give it to more users.
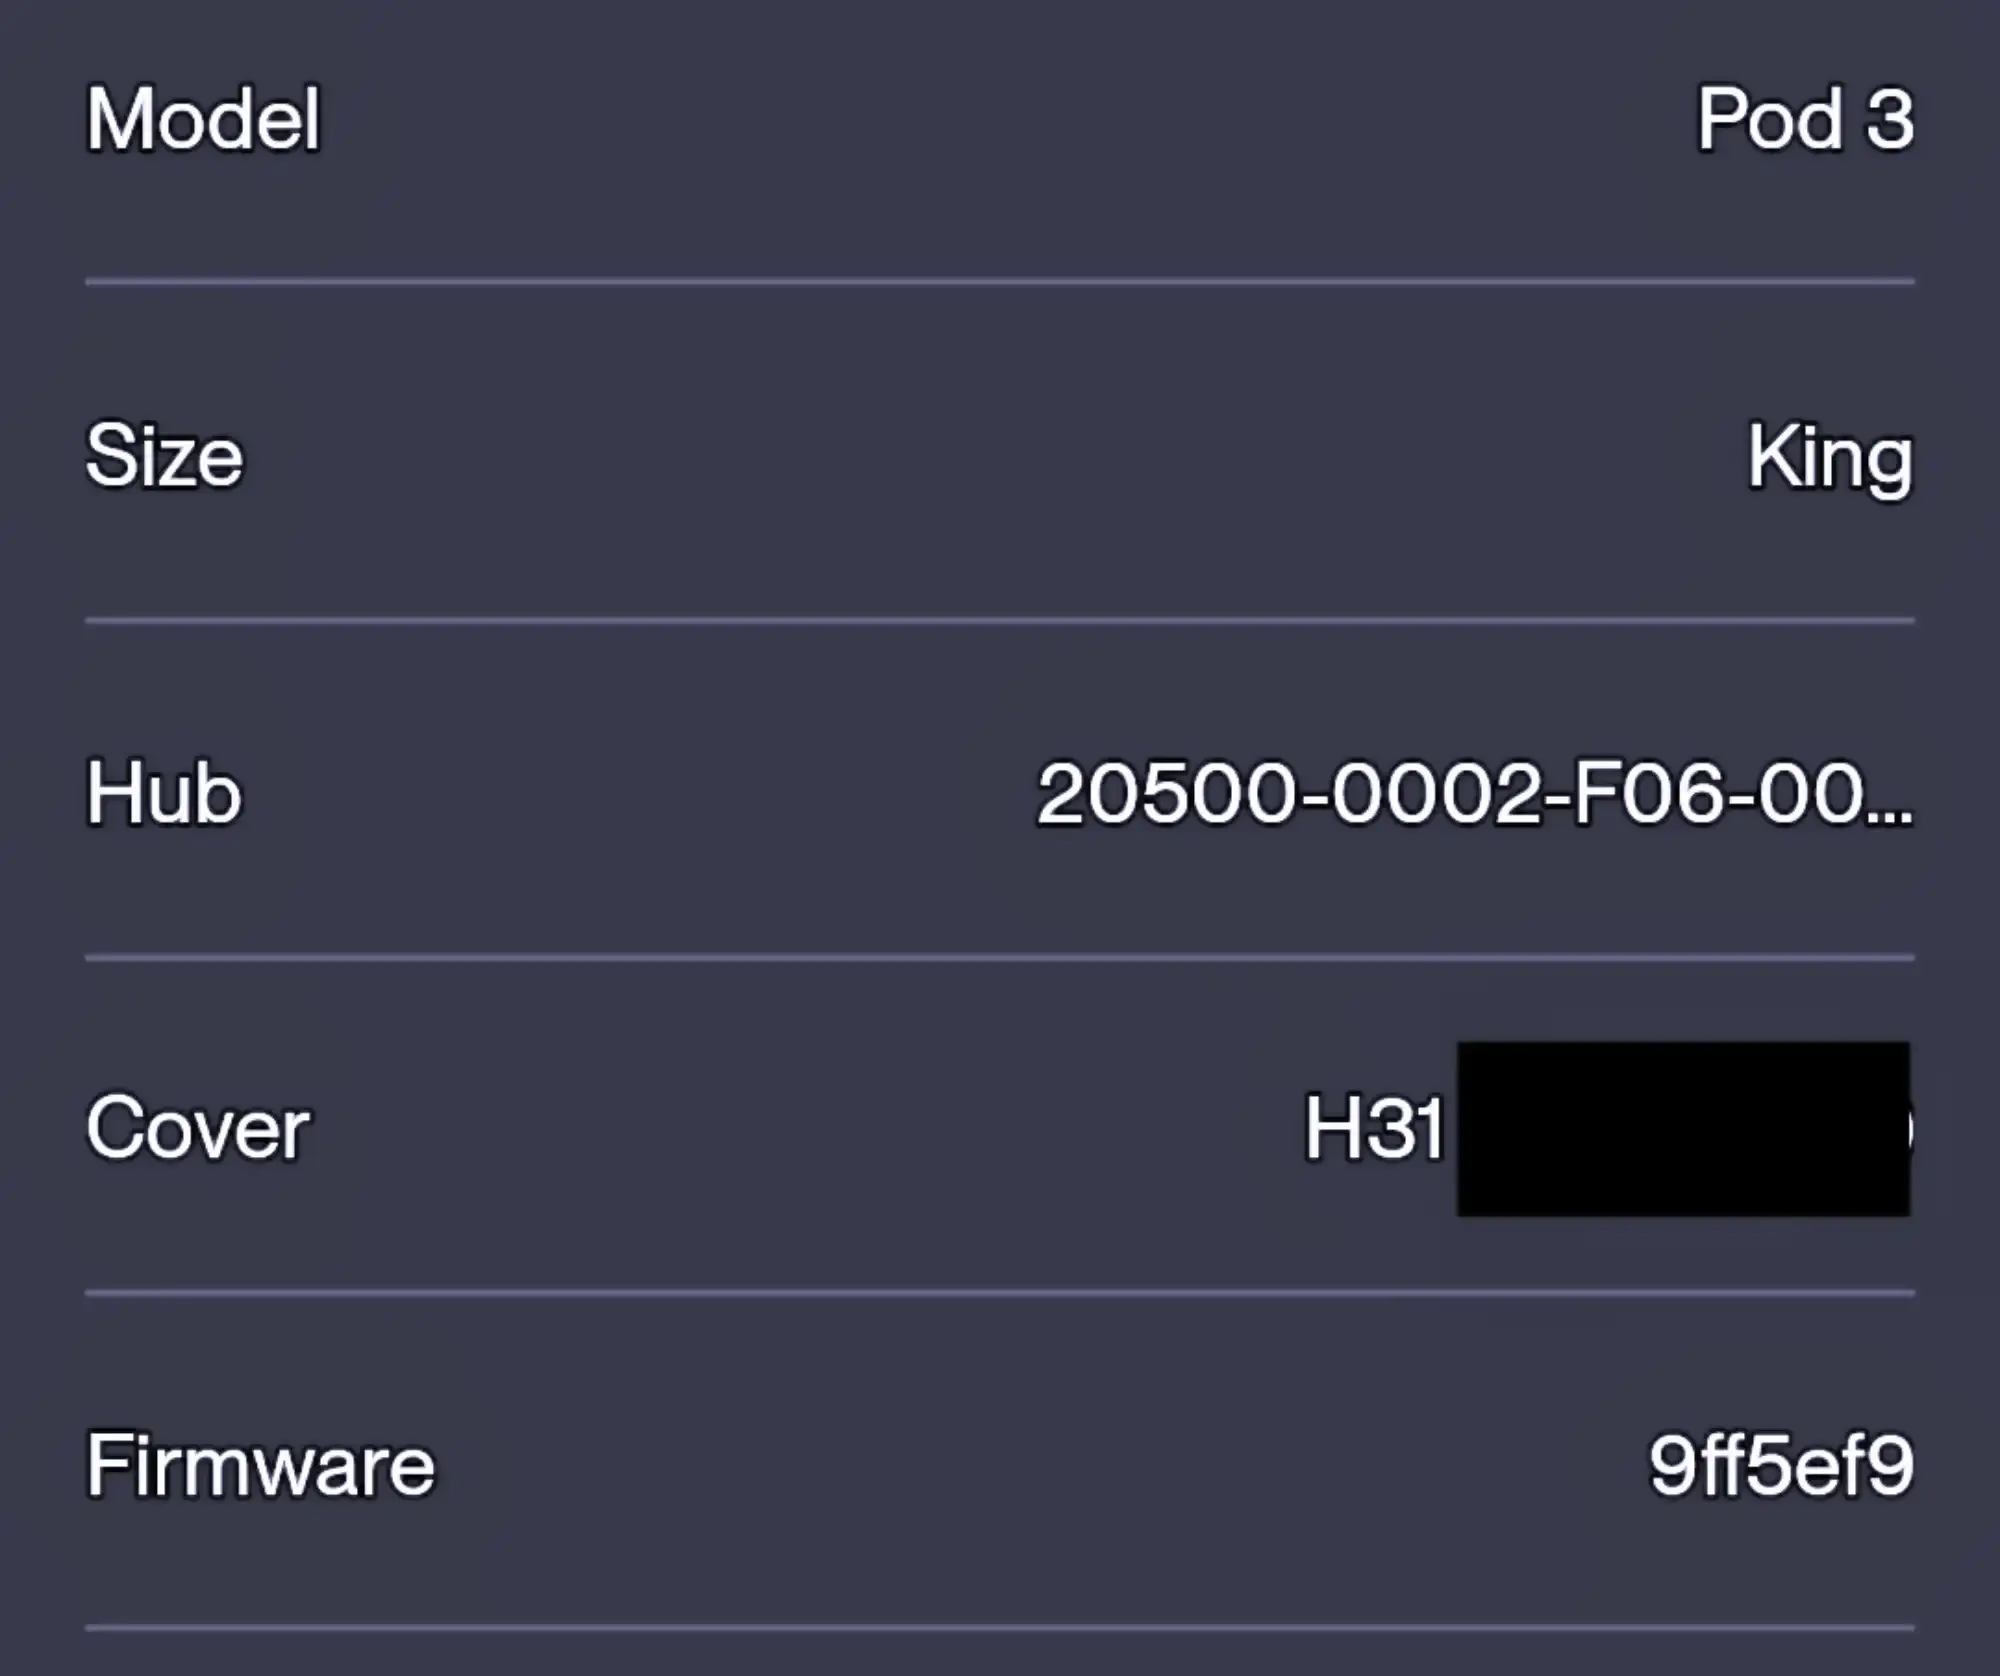
For reference, here’s the version details of the Pod I’m working with.
Disassembly Overview
There’s already a bit online about how to get root access. However, I ran into a few issues with the instructions, so I’m going to lay it out in more detail here.
The basic strategy is to open the case, get to the storage, then modify some files to allow us to remotely connect to the operating system. We’ll want to connect via the SSH protocol so we can operate the Pod like a normal Linux server.
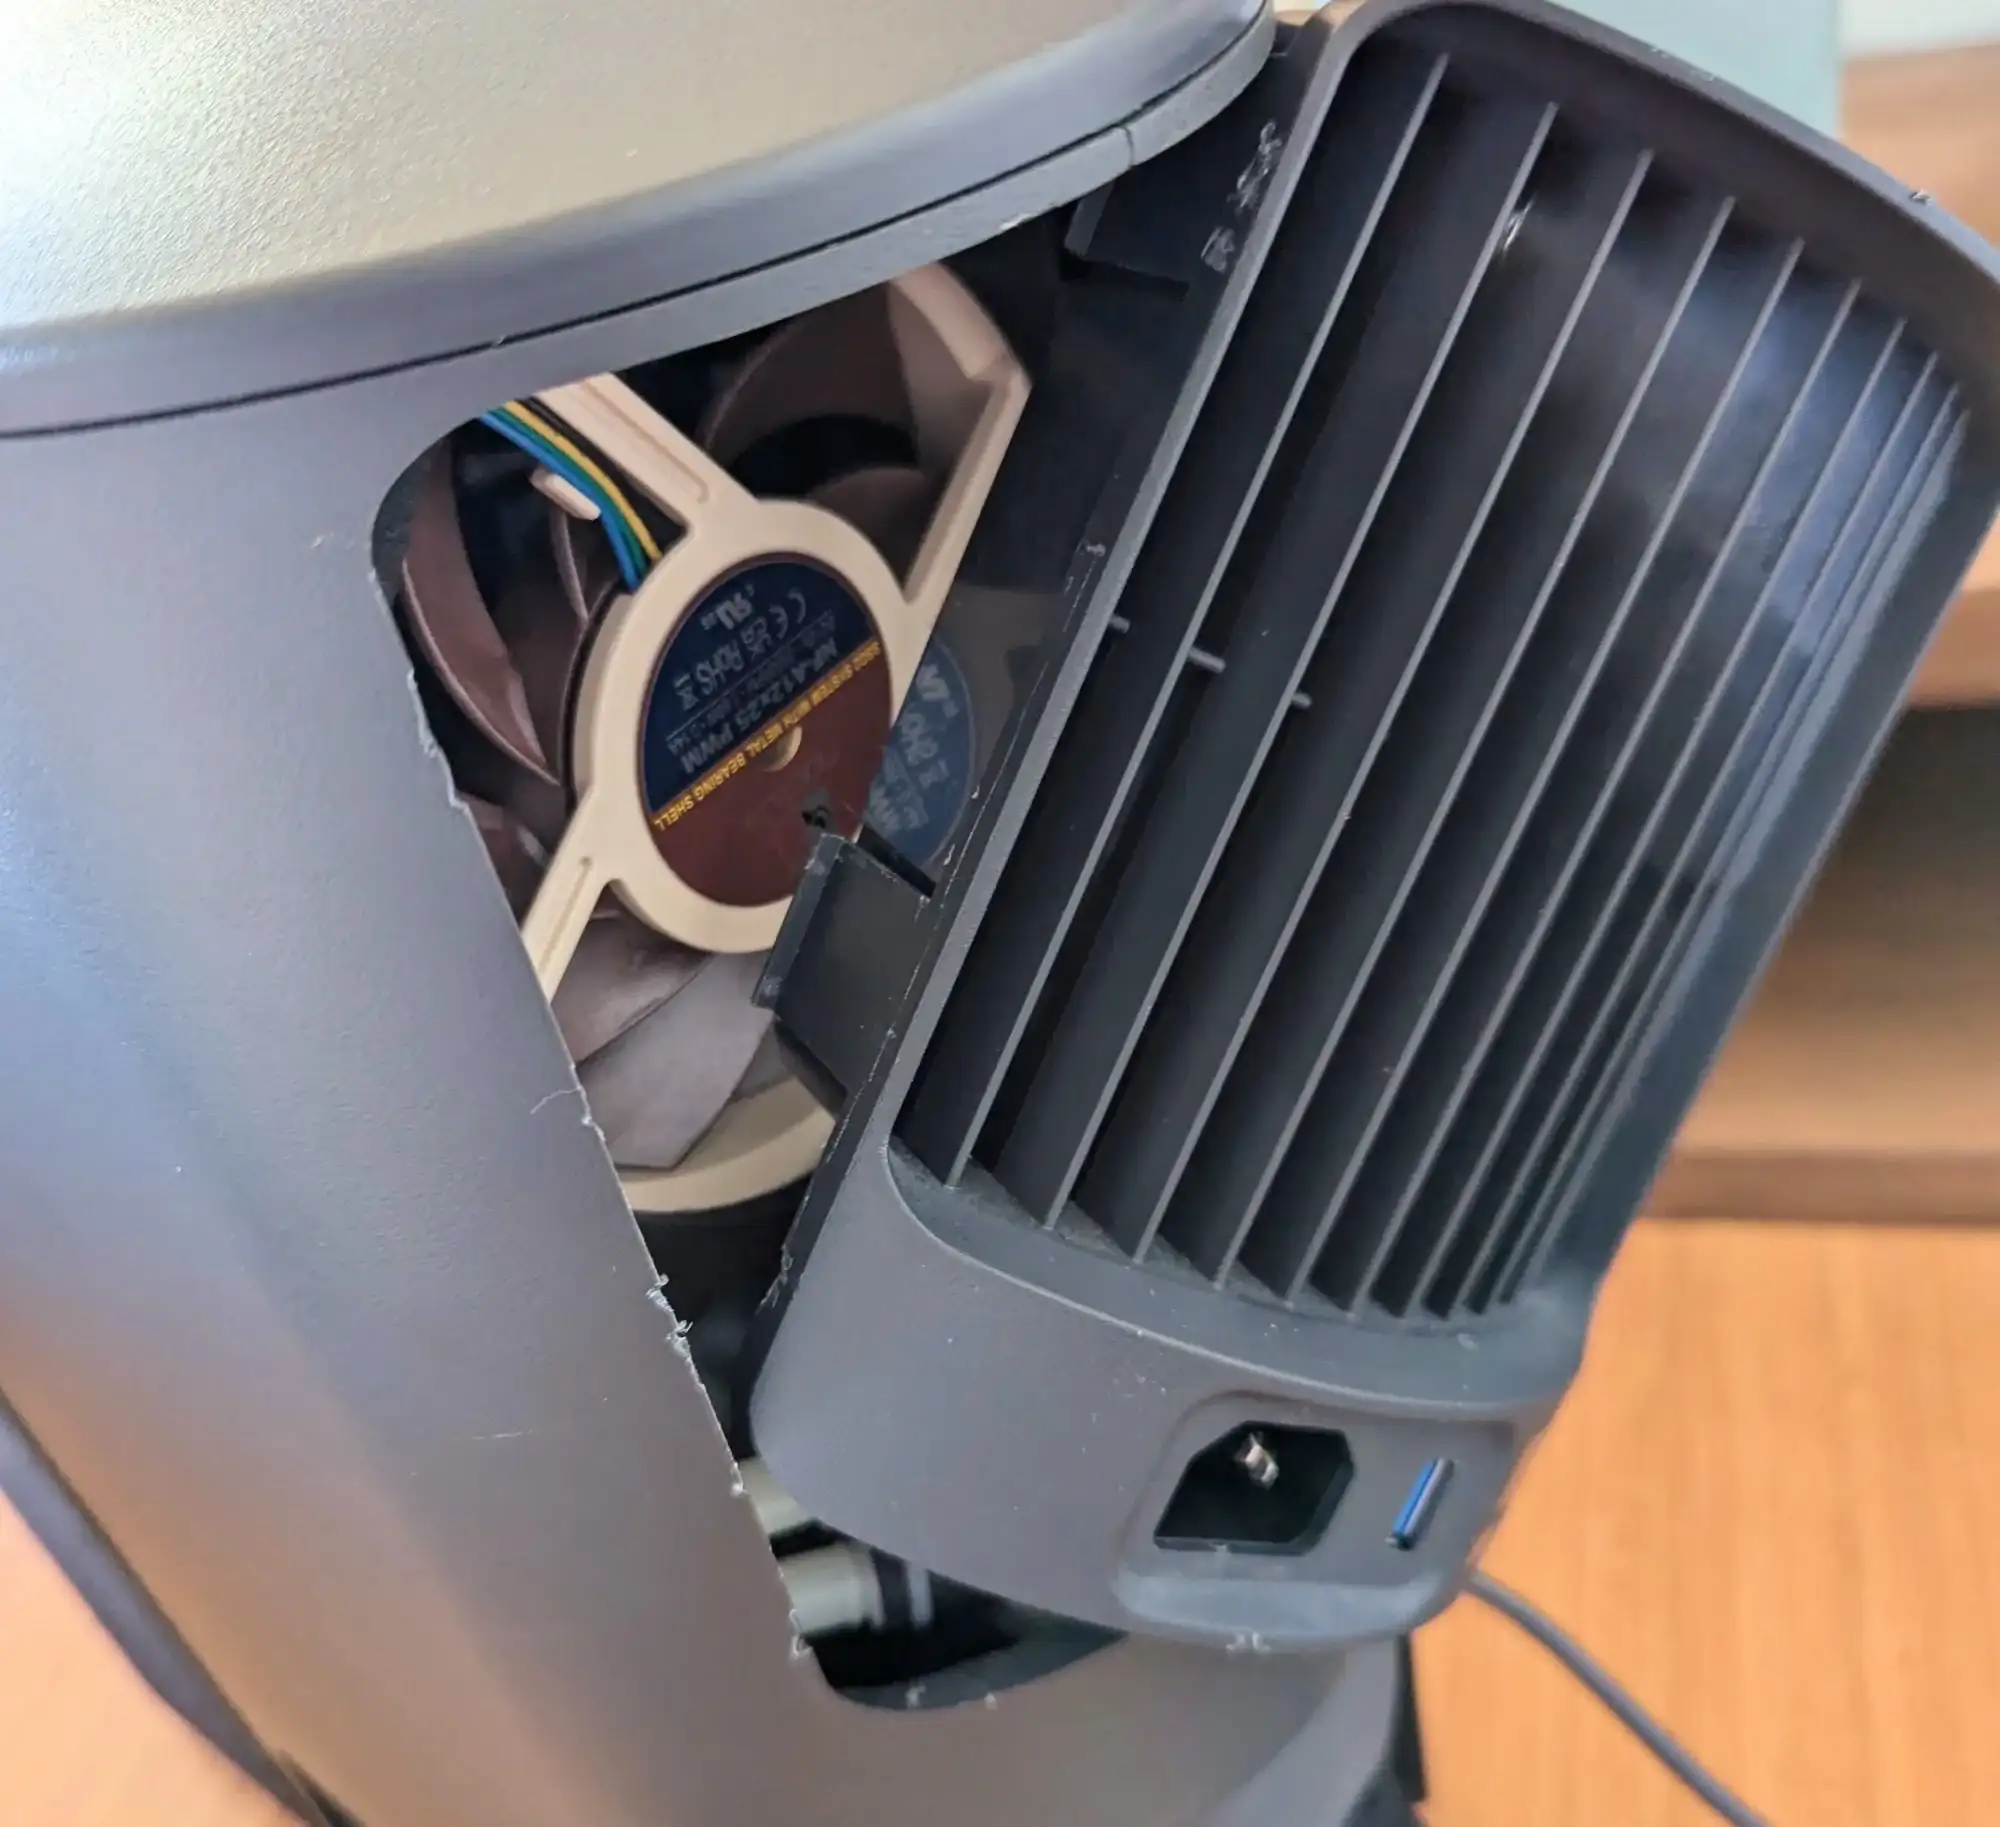
The Case
Getting into the case was tough. A kind soul on Reddit did a teardown with high quality images, which helped me figure out all the hidden clips. It’s clear Eight Sleep does not want customers opening this thing.
- Get the back grill off. This grill covers the fan on the back of the unit. This was the hardest part. The grill has 4 plastic clips securing it to the case. I was finally able to wedge a flat head screw driver between the seam and get one side unclipped. My case did not come out unscathed.
-
Once the grill is off, there’s 2 screws securing the top cover to the main case. These are located right where the top of the grill used to be. When reassembling the case, you can opt to not replace these screws. That way you wont have to take the grill off again.
-
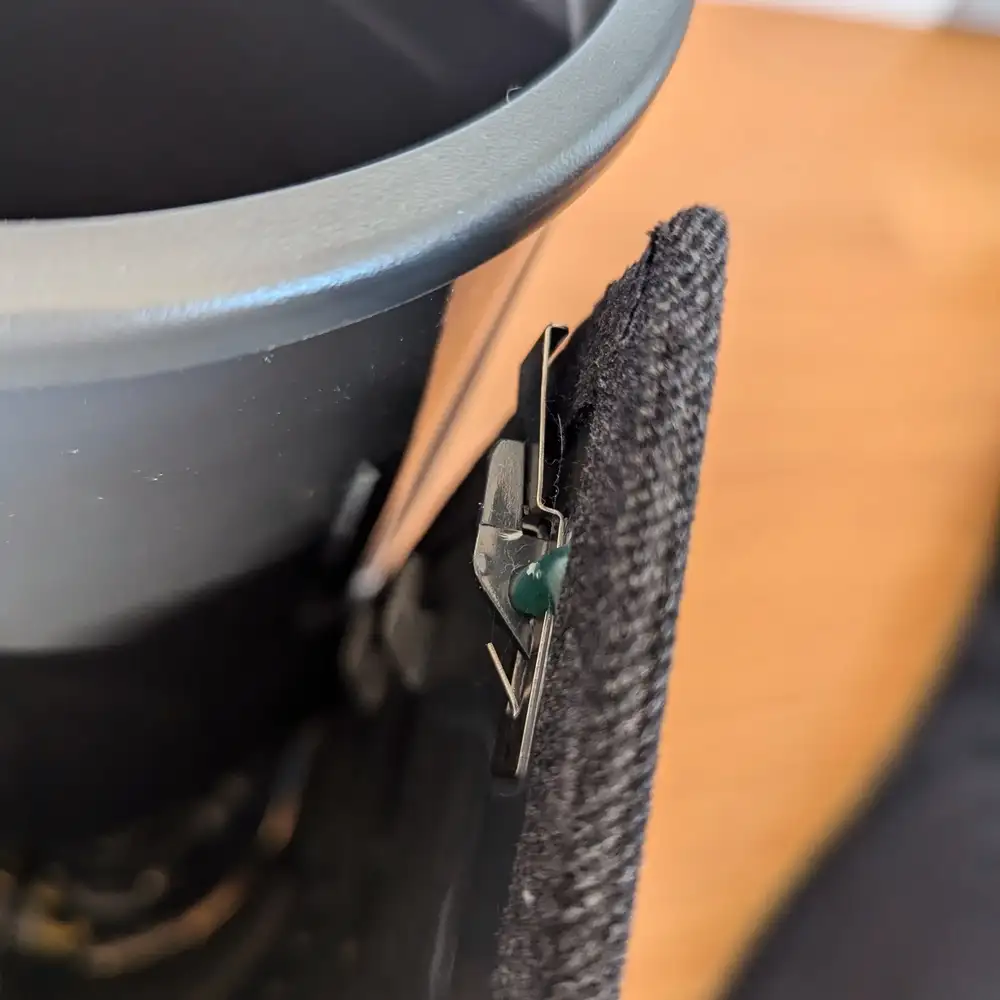
Remove the mesh on the front of the Pod. This was also pretty difficult. There are 2 hidden clips, about an inch down from the top, holding the mesh in place. I had to pry back the corner of the mesh with one screw driver, while popping the clip off with another, thinner screw driver. I never wanted another hand more. Once one side is off, the other is much easier.
- Now you can start to pry the top off. Start with the grill side and slowly lift the top off. Eventually it will get stuck on two plastic clips attaching it to the reservoir cylinder. You’ll need to pull these away from the cylinder to get the top fully off. If you take pliers and remove these clips from the top piece, you’ll be able to skip removing the mesh next time.
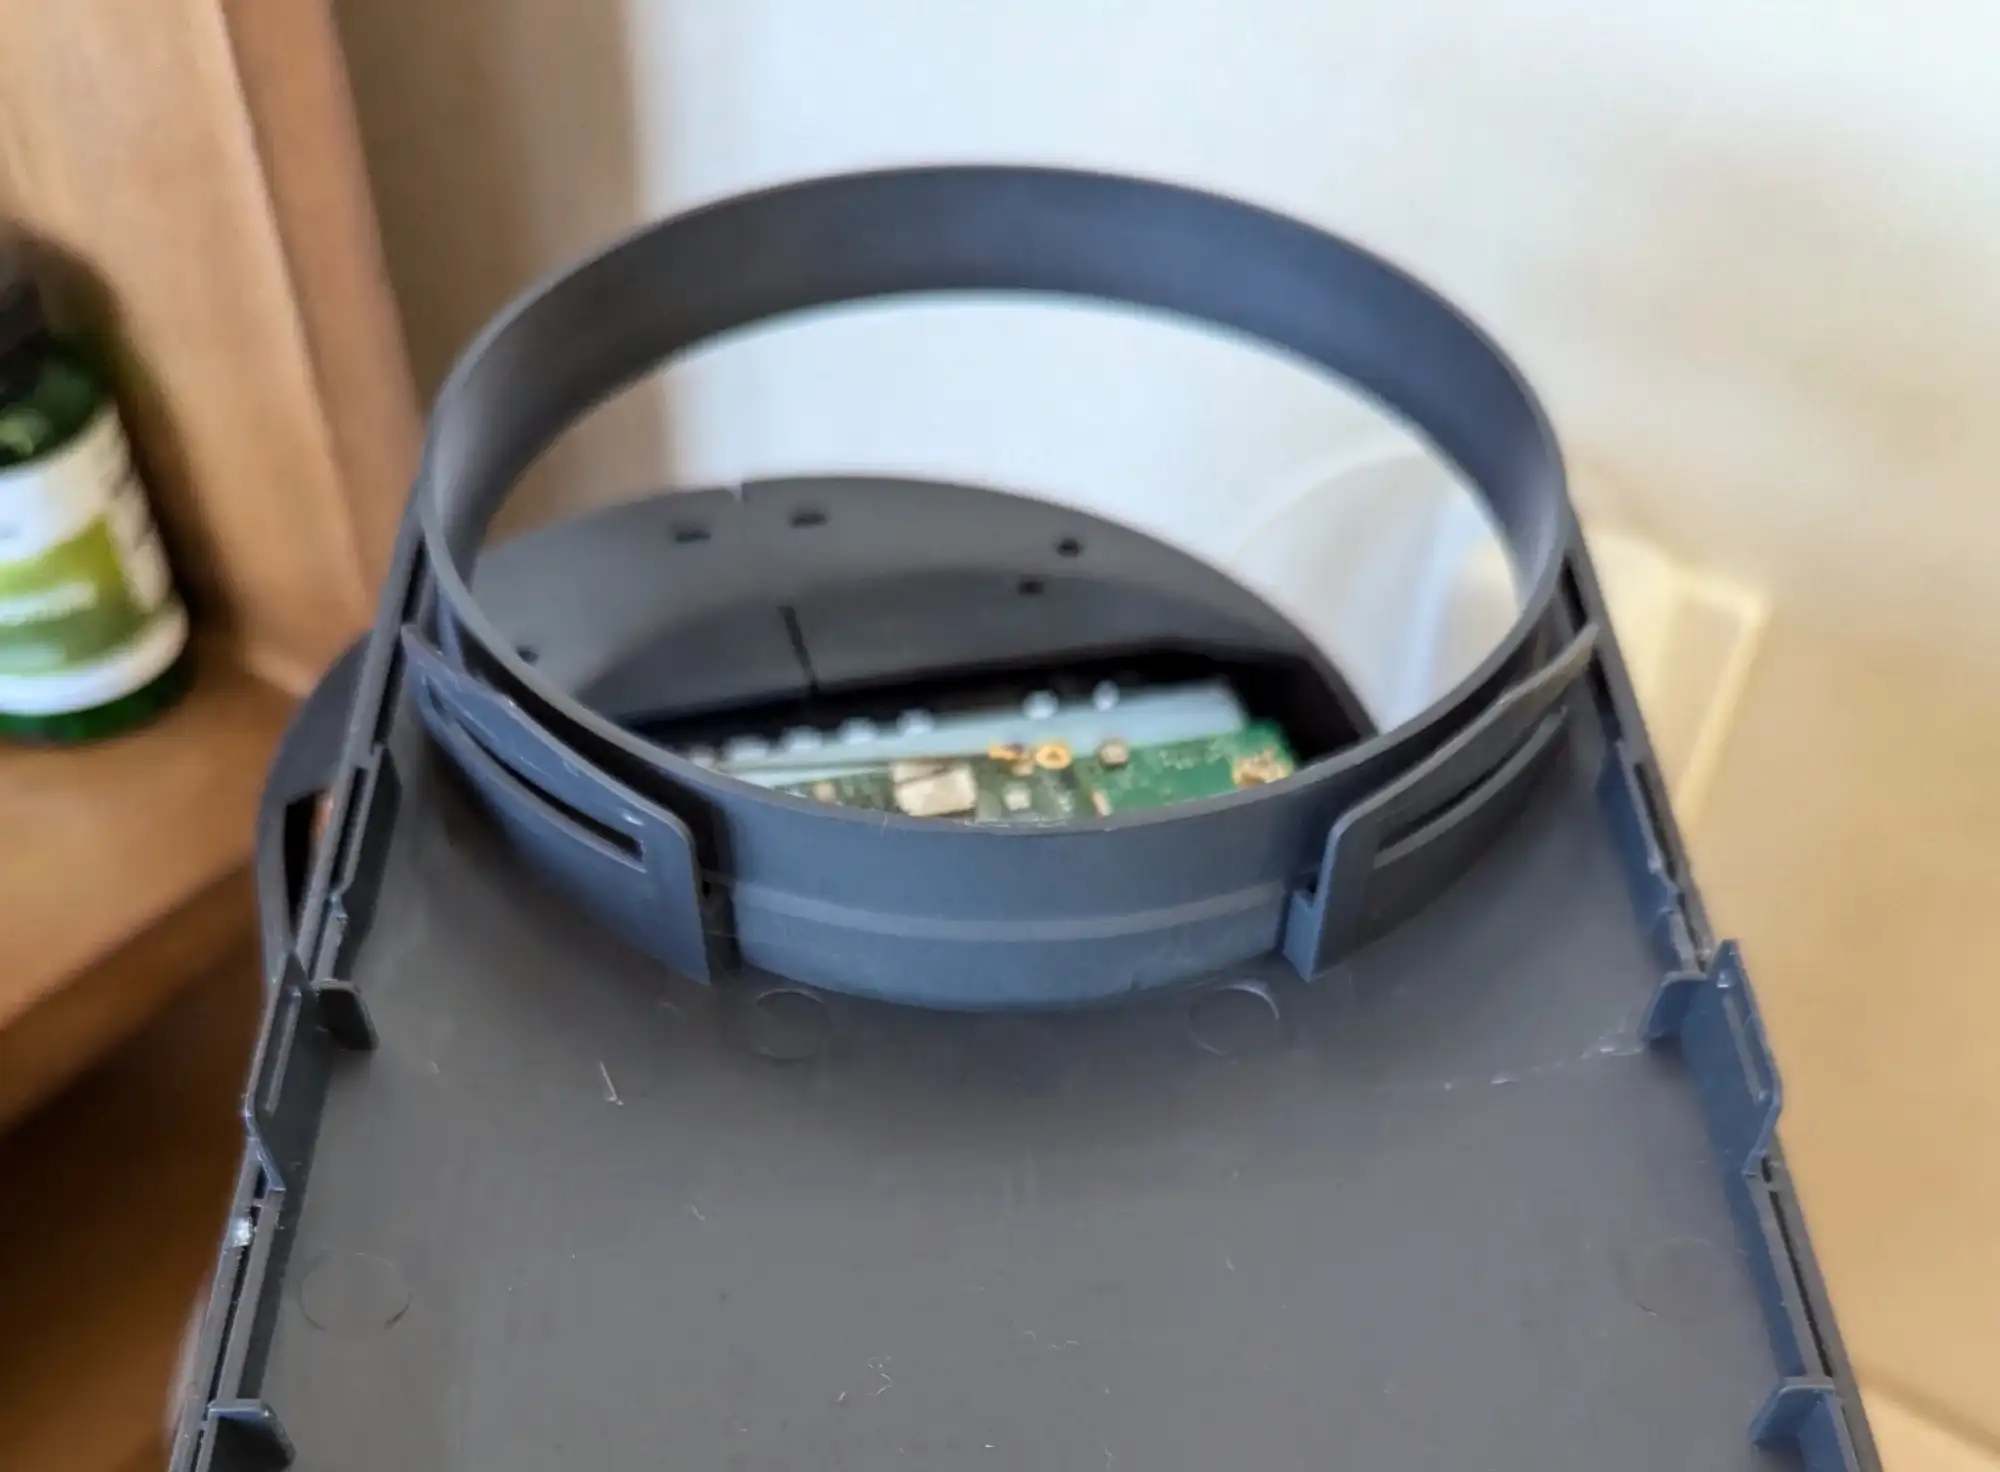
- Congratulations! You should now see the logic board on top of the Pod. That’s it for the case disassembly. Hopefully, you did less damage to your case than I did. Next we’ll modify the software to get us root access.
The Software
Now we have access to the logic board. There are 2 main parts, the main logic board that controls the sensors and pumps, and the daughter board that runs Linux. The daughter board is what we are interested in since that can make network connections.
My Pod version runs a system-on-chip (SoC), similar to a phone, like this: Variscite VAR-SOM-MX8M-MINI. It has a CPU, some memory, storage, wifi and bluetooth, all built into one package. It doesn’t have any removable media on it though. However, the main board does have a microSD card on it. This card is used by the daughter board to get the original firmware when the Pod is factory reset.
Here’s the rough process we’ll need to go through:
- Read the SD card, extract the factory firmware.
- Modify the firmware to open a backdoor so we can log into the Pod remotely (“get root”)
- Factory reset the Pod so it loads our modified firmware into the daughter board
Once the firmware is modified, any official updates will remove the backdoor.
Getting Root: Steps
These steps were done on an Apple Silicon Mac. They should work for any Linux system as well.
- Remove the daughter board from the main board. This will require two screws, then pull away the side clips and lift the board. This reveals the SD card.
- Remove the SD card. Mine had glue on it. A little bullying from my heat gun got it off quickly. The SD card is in a little cage that needs to be slid down to open.
- Read the SD card. This was tricky for me since the card is formatted with EXT4, something MacOS cannot read. After a ton of fussing around with free solutions, I found ExtFS for Mac worked right away. It’s $40, but as of writing this, it was the only way I could get working reliably. If you have a Linux computer, you’ll be able to read it right away.
- Copy
/opt/images/Yocto/rootfs.tar.gzfrom the card to your local machine. This is the factory boot image we’ll need to modify. At this point, it might be a good idea to back up all the files on the card as well, in case you’re like me and break everything. - Create (or get) your SSH key. We’re going to copy your public SSH key into the firmware so you can access your Pod remotely. If you don’t have an SSH key, Github has a good tutorial.
- Extract the firmware. We need the
/etc/ssh/authorized_keysfile from the firmware to add your public key to. - Add your public key as a line to
/etc/ssh/authorized_keys. - Add the
authorized_keysfile to the firmware. This part is tricky because of file permissions. If we don’t get everything right, the public key will fail to work. The most reliable way I found was to use an oldtartrick, append the new file to the end of the tar archive instead of opening it and modifying the original file.
# First ungzip the rootfs tar file
gunzip -c rootfs.tar.gz > rootfs.tar
# From the directory you extracted the firmware to earlier,
# append the keys file to the ungzipped tar file.
# --numeric-owner is the magic flag that keeps permissions working.
tar --numeric-owner -rf ../rootfs.tar ./etc/ssh/authorized_keys
# Re-gzip the patched rootfs file into the new patched firmware
gzip -c rootfs.tar > rootfs-patched.tar.gz
You can confirm everything looks right by listing all the files in the tar file: tar -tvf rootfs.tar. The authorized_keys file should be in there 2 times with the same permissions, but with a different modification date and size.
- Remove the old firmware and copy the patched firmware to the microSD card. Take care to make sure it has the right name:
rootfs.tar.gz.
Whew! That was hard, but we’re almost there.
-
Insert the card back into the Pod and re-install the daughter board. Make sure the daughter board is fully seated.
-
Factory reset the Pod. Hold the smaller button on the back of the pod, next to the power cable. While the button is held in, plug the power in. After a few seconds, you should see the pod’s light flash green. This indicates the device is performing a factory reset.
Once the Pod is back up, you’ll need to connect to it with the Eight Sleep app to configure Wifi again. Do not do any updates! Updates will undo all your hard work.
Logging in
At this point the Pod should be functioning normally, except with our backdoor installed. If everything went well, you should be able to log in. The root account is rewt and the SSH port is on the non-default port 8822:
ssh rewt@YOUR-POD-IP -p 8822You should be greeted by the system’s message of the day! Congrats! Give yourself a tiny dance to celebrate. You’re awesome. Now, the real fun can start.

Next Steps
Explore! We’ll need to poke around. If we want to fully set our Pods, we’ll want to find another way to get into the device without actually opening the case up. The current process is far too time consuming for most busy people. We’ll need to find a vulnerability or design flaw.
Possible areas of exploration:
- Poke around the contents of the
rootfs.tar.gzfile. Maybe there’s a setting that will allow us access? - Look at the application code. The app code is in
/home/dac/app/. It’s a nodejs app (called Pizza Rat??), and all the source code is there. - There’s more application code in
/opt/eight/bin. In it, something calledEight.Capybara, which seems to be a compiled dotNet app. There’s also a slew of scripts in there.
If you’d like to grab a copy of the firmware to see what’s there yourself, grab it here. Use cat firmware.swu | cpio -idmv to extract it. You’ll need to install cpio.
That’s it for now!
Shout out to Ninesleep for a lot of the info for this.
Appendix
Notes to remember for the future:
- Eight Sleep uses the Yocto Project to create a Linux-based firmware for the daughter board.
- The firmware seems to be ‘immutable’, but there are partitions on the SD card the SoC can use for persistent storage.
- Firmware updates come from
curl https://update-api.8slp.net/v1/updates/p1/1\?deviceId\=1\¤tRev\=1 -v, points to a bucket with the actual firmware. - Updates are packaged as a
swufile. Extract withcat firmware.swu | cpio -idmv - Updates are handled with swupdate.